I’ve been doing web performance for a while, so I’ve spent a lot of time in the Performance tab of the Chrome DevTools. But sometimes when you’re debugging a tricky perf problem, you have to go deeper. That’s where Chrome tracing comes in.
Chrome tracing (aka Chromium tracing) lets you record a performance trace that captures low-level details of what the browser is doing. It’s mostly used by Chromium engineers themselves, but it can also be helpful for web developers when a DevTools trace is not enough.
This post is a short guide on how to use this tool, from a web developer’s point of view. I’m not going to cover everything – just the bare minimum to get up and running.
Setup
First off, as described in this helpful post, you’re going to want a clean browser window. The tracing tool measures everything going on in the browser, including background tabs and extensions, which just adds unnecessary noise.
You can launch a fresh Chrome window using this command (on Linux):
google-chrome \
  --user-data-dir="$(mktemp -d)" --disable-extensions
Or on macOS:
/Applications/Google\ Chrome.app/Contents/MacOS/Google\ Chrome \
  --user-data-dir="$(mktemp -d)" --disable-extensions
Or if you’re lazy (like me), you can install a standalone browser like Chrome Canary and run that.
Record
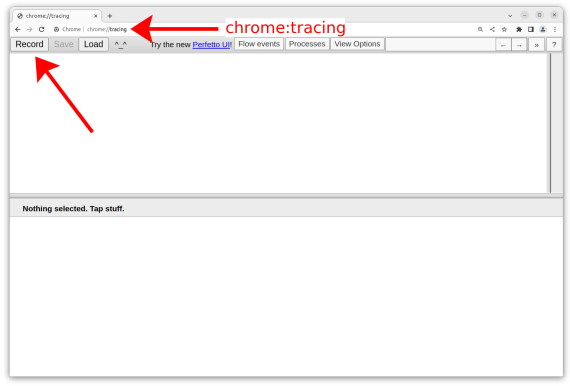
Next, go to about:tracing in the URL bar. (chrome:tracing or edge:tracing will also work, depending on your browser.) You’ll see a screen like this:
Click “Record.”
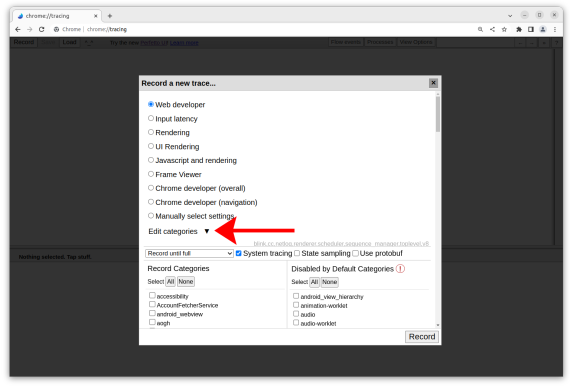
Next, you’ll be given a bunch of options. Here’s where it gets interesting.
Usually “Web developer” is a fine default. But sometimes you want extra information, which you can get by clicking “Edit categories.” Here are some of the “cheat codes” I’ve discovered:
- Check
blink.user_timingto show user timings (i.e.performance.measures) in the trace. This is incredibly helpful for orienting yourself in a complex trace. - Check
blink.debugto getSelectorStats, i.e. stats on slow CSS selectors during style calculation. - Check
v8.runtime_statsfor low-level details on what V8 is doing.
Note that you probably don’t want to go in here and check boxes with wild abandon. That will just make the trace slower to load, and could crash the tab. Only check things you think you’ll actually be using.
Next, click “Record.”
Now, switch over to another tab and do whatever action you want to record – loading a page, clicking a button, etc. Note that if you’re loading a page, it’s a good idea to start from about:blank to avoid measuring the unload of the previous page.
When you’re done recording, switch back and click “Stop.”
Analyze
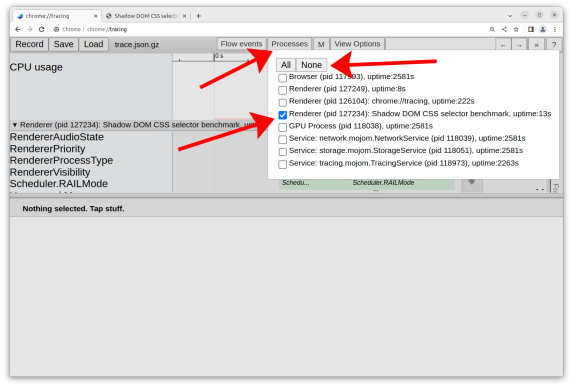
In the tracing UI, the first thing you’ll want to do is remove the noise. Click “Processes,” then “None,” then select only the process you’re interested in. It should say “Renderer” plus the title of the tab where you ran your test.
Moving around the UI can be surprisingly tricky. Here is what I usually do:
- Use the WASD keys to move left, right, or zoom in and out. (If you’ve played a lot of first-person shooters, you should feel right at home.)
- Click-and-drag on any empty space to pan around.
- Use the mousewheel to scroll up and down. Use ⌥/Alt + mousewheel to zoom in and out.
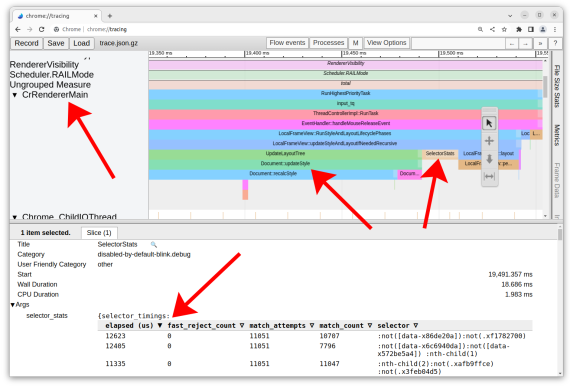
You’ll want to locate the CrRendererMain thread. This is the main thread of the renderer process. Under “Ungrouped Measure,” you should see any user timings (i.e. performance.measures) that you took in the trace.
In this example, I’ve located the Document::updateStyle slice (i.e. style calculation), as well as the SelectorStats right afterward. Below, I have a detailed table that I can click to sort by various columns. (E.g. you can sort by the longest elapsed time.)
Note that I have a performance.measure called “total” in the above trace. (You can name it whatever you want.)
General strategy
I mostly use Chrome tracing when there’s an unexplained span of time in the DevTools. Here are some cases where I’ve seen it come in handy:
- Time spent in IndexedDB (the
IndexedDBflag can be helpful here). - Time spent in internal subsystems, such as accessibility or spellchecking.
- Understanding which CSS selectors are slowest (see
SelectorStatsabove).
My general strategy is to first run the tool with the default settings (plus blink.user_timing, which I almost always enable). This alone will often tell you more than the DevTools would.
If that doesn’t provide enough detail, I try to guess which subsystem of the browser has a performance problem, and tick flags related to that subsystem when recording. (For instance, skia is related to rendering, blink_style and blink.invalidation are probably related to style invalidation, etc.) Unfortunately this requires some knowledge of Chromium’s internals, along with a lot of guesswork.
When in doubt, you can always file a bug on Chromium. As long as you have a consistent repro, and you can demonstrate that it’s a Chromium-only perf problem, then the Chromium engineers should be able to route it to the right team.
Conclusion
The Chrome tracing tool is incredibly complex, and it’s mostly designed for browser engineers. It can be daunting for a web developer to pick up and use. But with a little practice, it can be surprisingly helpful, especially in odd perf edge cases.
There is also a new UI called Perfetto that some may find easier to use. I’m a bit old-school, though, so I still prefer the old UI for now.
I hope this short guide was helpful if you ever find yourself stuck with a performance problem in Chrome and need more insight into what’s going on!
See also: “Chrome Tracing for Fun and Profit” by Jeremy Rose.


Posted by Ralph Haygood on October 26, 2022 at 1:58 PM
Very helpful. Thank you.
Posted by Patrice on February 28, 2023 at 11:14 PM
blink.debug and v8.runtime_stats is not available for me in Chrome 110
Posted by GeorgeS on May 3, 2023 at 4:47 PM
Hello, i completed chrome tracing about 3 times just of seeing what will happen..
Those tracings take internal storage in my android device??
If yes how can i delete these files to free some space..?
Posted by Web Performance Calendar » Digging through Chrome traces: an introduction with an example on December 21, 2023 at 2:04 PM
[…] DevTools has enabled in tracing. There are some great articles about this situation; one by Nolan Lawson and one by Jeremy Rose. But starting from Chrome 103, there is a new experiment to enable more of […]
Posted by Sam on February 22, 2024 at 10:07 AM
Thanks. The display of the traces show the timestamps in the time axis (like 19,400ms etc etc). My understanding is the time axis is always offset so it starts from 0, even when the trace data in the json file has the absolute time entered. Is there a way to show timestamps in the entered values? or even better like wall clocktime?