Update: This blog post is now out-of-date. Please see the official documentation on GitHub.
Say you’re writing an Android app, and you have a ListView you’d like to divide into sections:

Sectioned list views.
Normally, you’d need to write a custom ListAdapter, where you define the resources yourself and juggle two different types of View. Not fun.
public class MyBoringAdapter<Foo> extends ArrayAdapter<Foo> {

    // constructors...

    public int getViewTypeCount() {
      return 2;
    }

    public int getItemViewType(int pos) {
      return isHeader(pos) ? 0 : 1;
    }

    // more boilerplate...

    public View getView(int pos, View view, ViewGroup parent) {
        if (isHeader(pos)) {
            // sigh
        } else {
            // so tired of this crap
        }
    }
}
Now, what happens if you want to change the ordering? Or add new sections? Or add fast-scroll overlays?
It’s one of the most common UI patterns in Android, and yet (surprisingly) it’s still a pain to implement. Nothing in the stock Android SDK provides this functionality.
Enter the SuperSaiyanScrollView (dramatic gong sound). It’s a standalone library that you can easily import into any Android app, and it seamlessly adds fast-scrolling, sorting, and sectioning. Plus, it looks great on both Android 4.0 and pre-4.0 devices, on tablets and phones.

SuperSaiyanScrollView on HTC Magic (Eclair) and Galaxy Nexus (Jelly Bean)
Why “Super Saiyan”? Because:
- I made it, so I get to name it.
- It’s super-fast, super-powerful, and it kicks (stock) Android’s ass.

Their power levels are definitely over 9000.
Usage
The SuperSaiyanScrollView code attemps to be as unobtrusive as possible. To use it, you just need to wrap your existing ListView in a SuperSaiyanScrollView and your existing Adapter in a SectionedListAdapter.
In your layout XML file, add a SuperSaiyanScrollView around your ListView:
    <com.nolanlawson.supersaiyan.widget.SuperSaiyanScrollView
      android:id="@+id/scroll"
      android:layout_width="match_parent"
      android:layout_height="match_parent">

      <ListView
        android:id="@android:id/list"
        android:layout_width="match_parent"
        android:layout_height="match_parent"
        android:scrollbars="none"
        />

    </com.nolanlawson.supersaiyan.widget.SuperSaiyanScrollView>
(I like to set android:scrollbars="none", to remove the omnipresent gray scrollbars and stick with the “fast” blue scrollbars.)
Next, wrap your existing Adapter (e.g. an ArrayAdapter) in a SectionedListAdapter. The SectionedListAdapter uses a fluent “builder” pattern, similar to AlertDialog.Builder:
    SectionedListAdapter<MyCoolAdapter> adapter =
        SectionedListAdapter.Builder.create(this, myCoolAdapter)
        .setSectionizer(new Sectionizer<MyCoolListItem>(){

          @Override
          public CharSequence toSection(MyCoolListItem item) {
            return item.toSection();
          }
        })
        .sortKeys()
        .sortValues()
        .build();
To include the SuperSaiyanScrollView in your Android app, simply follow these steps:
- Check out the code from GitHub:
git clone https://github.com/nolanlawson/SuperSaiyanScrollView.git
- If you use Eclipse/ADT, go to Import -> Existing Android Code -> and choose the
SuperSaiyanScrollView/library/folder. - If you use Proguard, add the following to your
proguard.cfg:
-keep class com.nolanlawson.supersaiyan.widget.** { *; }
For more information on importing library projects, read this section of the Android developer guide.
Examples
I’m going to walk through some short examples, which should demonstrate the simplicity and flexibility of the SuperSaiyanScrollView. The source code for these apps is included in the GitHub project, and you can download the APKs here:
Example #1: Countries
In this example, we have a list of countries, which we’d like to sort by continent. The finished app looks like this:

We have a simple Country object:
public class Country {

  private String name;
  private String continent;

  /* getters and setters ... */

  @Override
  public String toString() {
    return name;
  }
}
We use a basic ArrayAdapter<Country> to display the countries:
ArrayAdapter<Country> adapter = new ArrayAdapter<Country>(
        this,
        android.R.layout.simple_spinner_item,
        countries);
Next, we wrap it in a SectionedListAdapter. In this case, we’d like to section countries by their continent, sort the continents by name, and sort countries by name:
    sectionedAdapter =
        SectionedListAdapter.Builder.create(this, adapter)
        .setSectionizer(new Sectionizer<Country>(){

          @Override
          public CharSequence toSection(Country input) {
            return input.getContinent();
          }
        })
        .sortKeys()
        .sortValues(new Comparator<Country>() {

          public int compare(Country lhs, Country rhs) {
            return lhs.getName().compareTo(rhs.getName());
          }
        })
        .build();
A Sectionizer is a simple callback that provides a section name for the given list item. In your own code, this might be a HashMap lookup, a database query, or a simple getter (as in this example).
Notice also that the keys (i.e. the section titles) and the values (i.e. the list contents) can be sorted independently, or not sorted at all. By default, they’re sorted according to the input order.
Now, let’s try to change the sections dynamically! In the action bar, the user can switch between alphabetic sorting and continent sorting:

To do so, we first get a reference to the SuperSaiyanScrollView:
SuperSaiyanScrollView superSaiyanScrollView =
    (SuperSaiyanScrollView) findViewById(R.id.scroll);
Then, we call the following function whenever the user chooses alphabetic sorting:
  private void sortAz() {

    // use the built-in A-Z sectionizer
    sectionedAdapter.setSectionizer(
        Sectionizers.UsingFirstLetterOfToString);

    // refresh the adapter and scroll view
    sectionedAdapter.notifyDataSetChanged();
    superSaiyanScrollView.refresh();
  }
Notice that the SectionedListAdapter and SuperSaiyanScrollView need to be informed whenever their content changes.
Next, when the user switches back to continent sorting, we call this function:
  private void sortByContinent() {

    // use the by-continent sectionizer
    sectionedAdapter.setSectionizer(new Sectionizer<Country>(){

          @Override
          public CharSequence toSection(Country input) {
            return input.getContinent();
          }
        });

    // refresh the adapter and scroll view
    sectionedAdapter.notifyDataSetChanged();
    superSaiyanScrollView.refresh();
  }
Notice that you never need to call adapter.sort() or Collections.sort() yourself. The SectionedListAdapter handles everything. And it does so without ever modifying the underlying adapter, which means that view generation is lightning-fast.
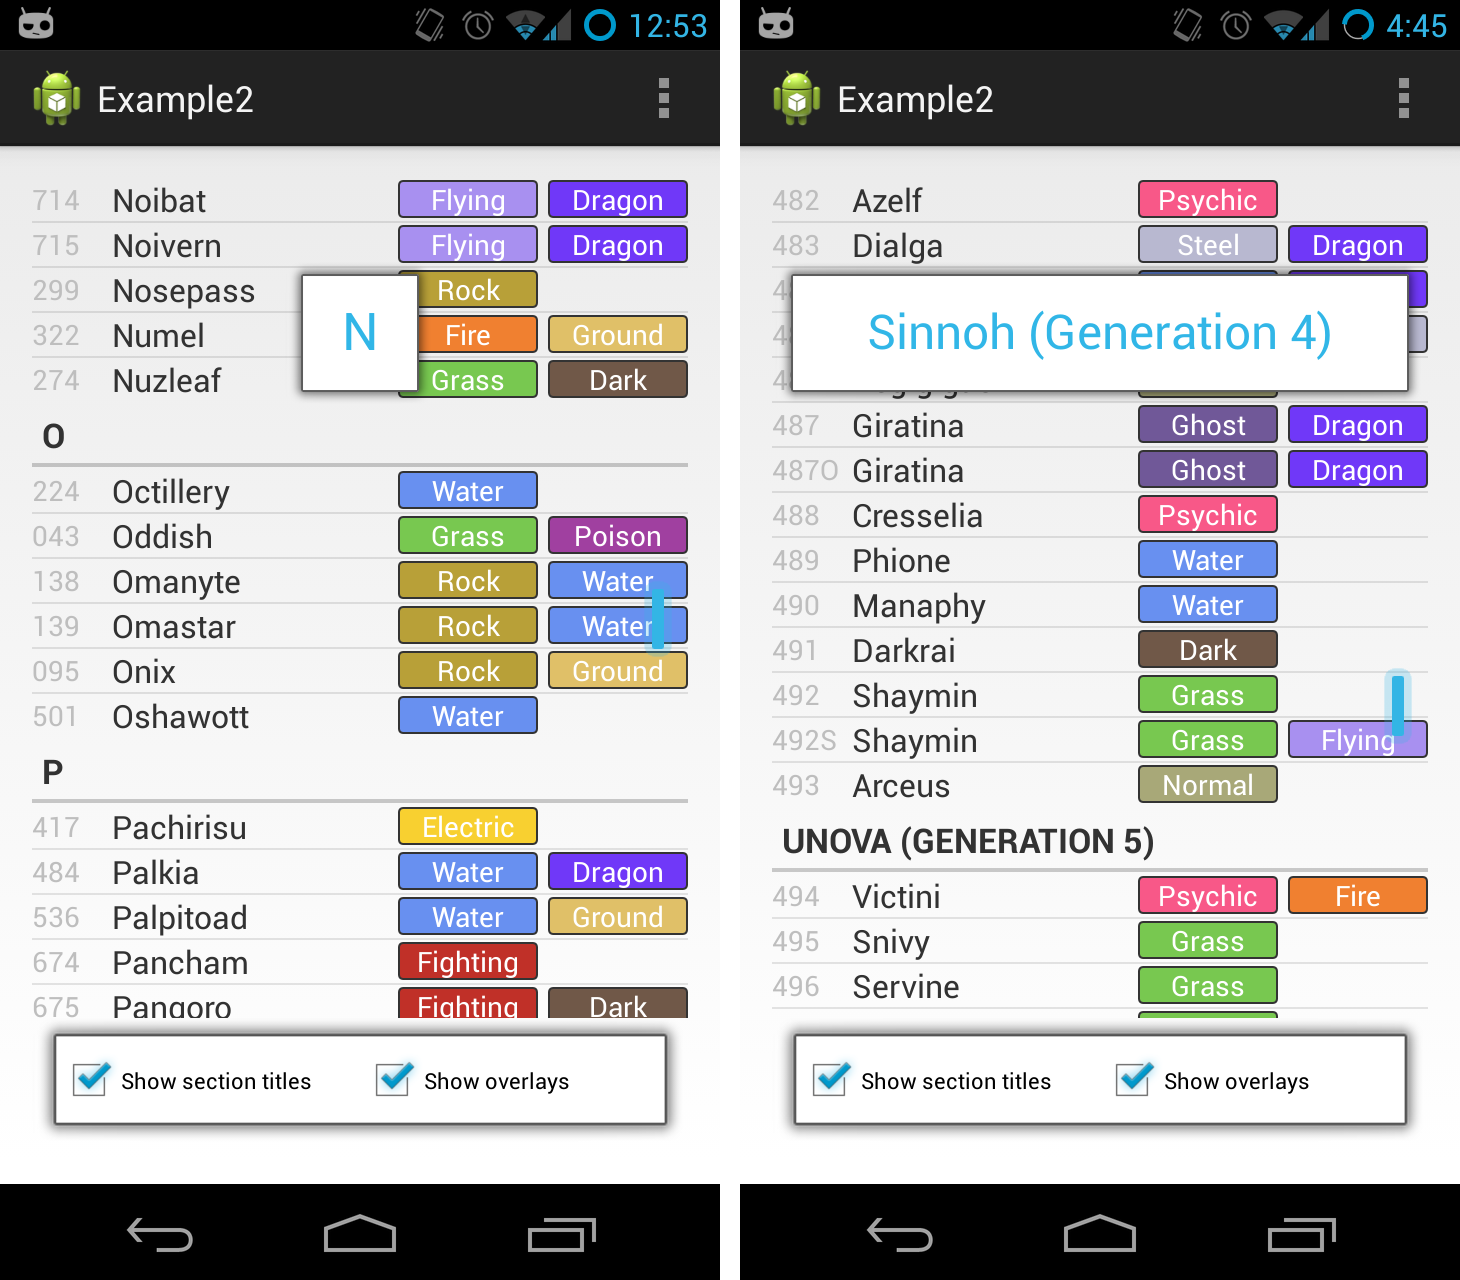
Example #2: Pokémon
This example shows off some of the advanced functionality of the SuperSaiyanScrollView. We have three different sortings, the size of the overlay box changes to fit the text size, and we can dynamically hide both the overlays and the section titles.
First off, the size of the overlay can be configured in XML. In this example, we start off with a single-letter alphabetic sorting, so we want the overlays to be a bit smaller than normal.
Add a namespace to the root XML tag in your layout XML:
<RelativeLayout
  ...
  xmlns:myapp="http://schemas.android.com/apk/res/com.example.example1"
  ...
  >
</RelativeLayout>
Next, use values prefixed with ssjn_ to define the size of the overlay:
<com.nolanlawson.supersaiyan.widget.SuperSaiyanScrollView
  ...
  myapp:ssjn_overlaySizeScheme="normal">

  <ListView
    ...
    />

</com.nolanlawson.supersaiyan.widget.SuperSaiyanScrollView>
I include the built-in schemes small (for one letter), normal (for most use cases), and large and xlarge (for longer section titles). Section titles of up to two lines (separated by \n) are supported.

Small, normal, large, and xlarge overlays in my AMG Geneva app.
If you want, you can also manually specify the font size, width, height, and text color yourself:
<com.nolanlawson.supersaiyan.widget.SuperSaiyanScrollView
  ...
  myapp:ssjn_overlayWidth="400dp"
  myapp:ssjn_overlayHeight="200dp"
  myapp:ssjn_overlayTextSize="12sp"
  myapp:ssjn_overlayTextColor="@android:color/black" >

  <ListView
    ...
    />
</com.nolanlawson.supersaiyan.widget.SuperSaiyanScrollView>
Now, in the Java source, we have a PocketMonster object:
public class PocketMonster {

  private String uniqueId;
  private int nationalDexNumber;
  private String type1;
  private String type2;
  private String name;

  /* getters and setters */

  @Override
  public String toString() {
    return name;
  }
}
We have a simple PocketMonsterAdapter to define how the monsters are displayed in the list:
public class PocketMonsterAdapter
    extends ArrayAdapter<PocketMonster> {

  // Constructors...

  @Override
  public View getView(int pos, View view,
      ViewGroup parent) {

    PocketMonster monster =
        (PocketMonster) getItem(pos);

    /* Create and style the view... */

    return view;
  }
}
We wrap this adapter in a SectionedListAdapter that, by default, sections and sorts everything alphabetically:
    adapter = SectionedListAdapter.Builder.create(this, subAdapter)
        .setSectionizer(Sectionizers.UsingFirstLetterOfToString)
        .sortKeys()
        .sortValues(new Comparator<PocketMonster>(){

          @Override
          public int compare(PocketMonster lhs,
                PocketMonster rhs) {
            return lhs.getName().compareToIgnoreCase(
                rhs.getName());
          }})
        .build();
Notice that we call both sortKeys() and sortValues(), because we want both the section titles and the Pokémon to be ordered alphabetically. Since PocketMonster does not implement Comparable, we defined a custom Comparator.
Now let’s say we want to organize the Pokémon by region:

Some quick background: Pokémon are ordered by their “national ID,” an integer value that starts at 1 (Bulbasaur) and goes up to 718 (Zygarde). Every time Nintendo releases a new generation of Pokémon games, they add about 100 new monsters, set the game in a new “region,” and sell about a bazillion new Pokémon toys.
So basically, we can determine the regions from the Pokémon’s ID. We’ll define a new
Sectionizer, which is called when the user selects “sort by region”:
  private void sortByRegion() {
    adapter.setSectionizer(new Sectionizer<PocketMonster>() {

      @Override
      public CharSequence toSection(PocketMonster input) {
        int id = input.getNationalDexNumber();

        // Kanto region will appear first, followed
        // by Johto, Hoenn, Sinnoh, Unova, and Kalos
        if (id <= 151) {
          return "Kanto (Generation 1)";
        } else if (id <= 251) {
          return "Johto (Generation 2)";
        } else if (id <= 386) {
          return "Hoenn (Generation 3)";
        } else if (id <= 493) {
          return "Sinnoh (Generation 4)";
        } else if (id <= 649) {
          return "Unova (Generation 5)";
        } else {
          return "Kalos (Generation 6)";
        }
      }
    });

    // uses the nat'l pokedex order, since
    // that's the original input order
    adapter.setKeySorting(Sorting.InputOrder);
    adapter.setValueSorting(Sorting.InputOrder);
    scrollView.setOverlaySizeScheme(
        OverlaySizeScheme.Large);

    // refresh the adapter and scroll view
    adapter.notifyDataSetChanged();
    scrollView.refresh();
  }
Notice that we’ve changed the key and value sorting to Sorting.InputOrder, because now we want to order Pokémon by their national IDs, which was the order the data was read in. (A custom Comparator would have also done the trick.) Additionally, we’ve increased the size of the overlay to accommodate the longer section text.
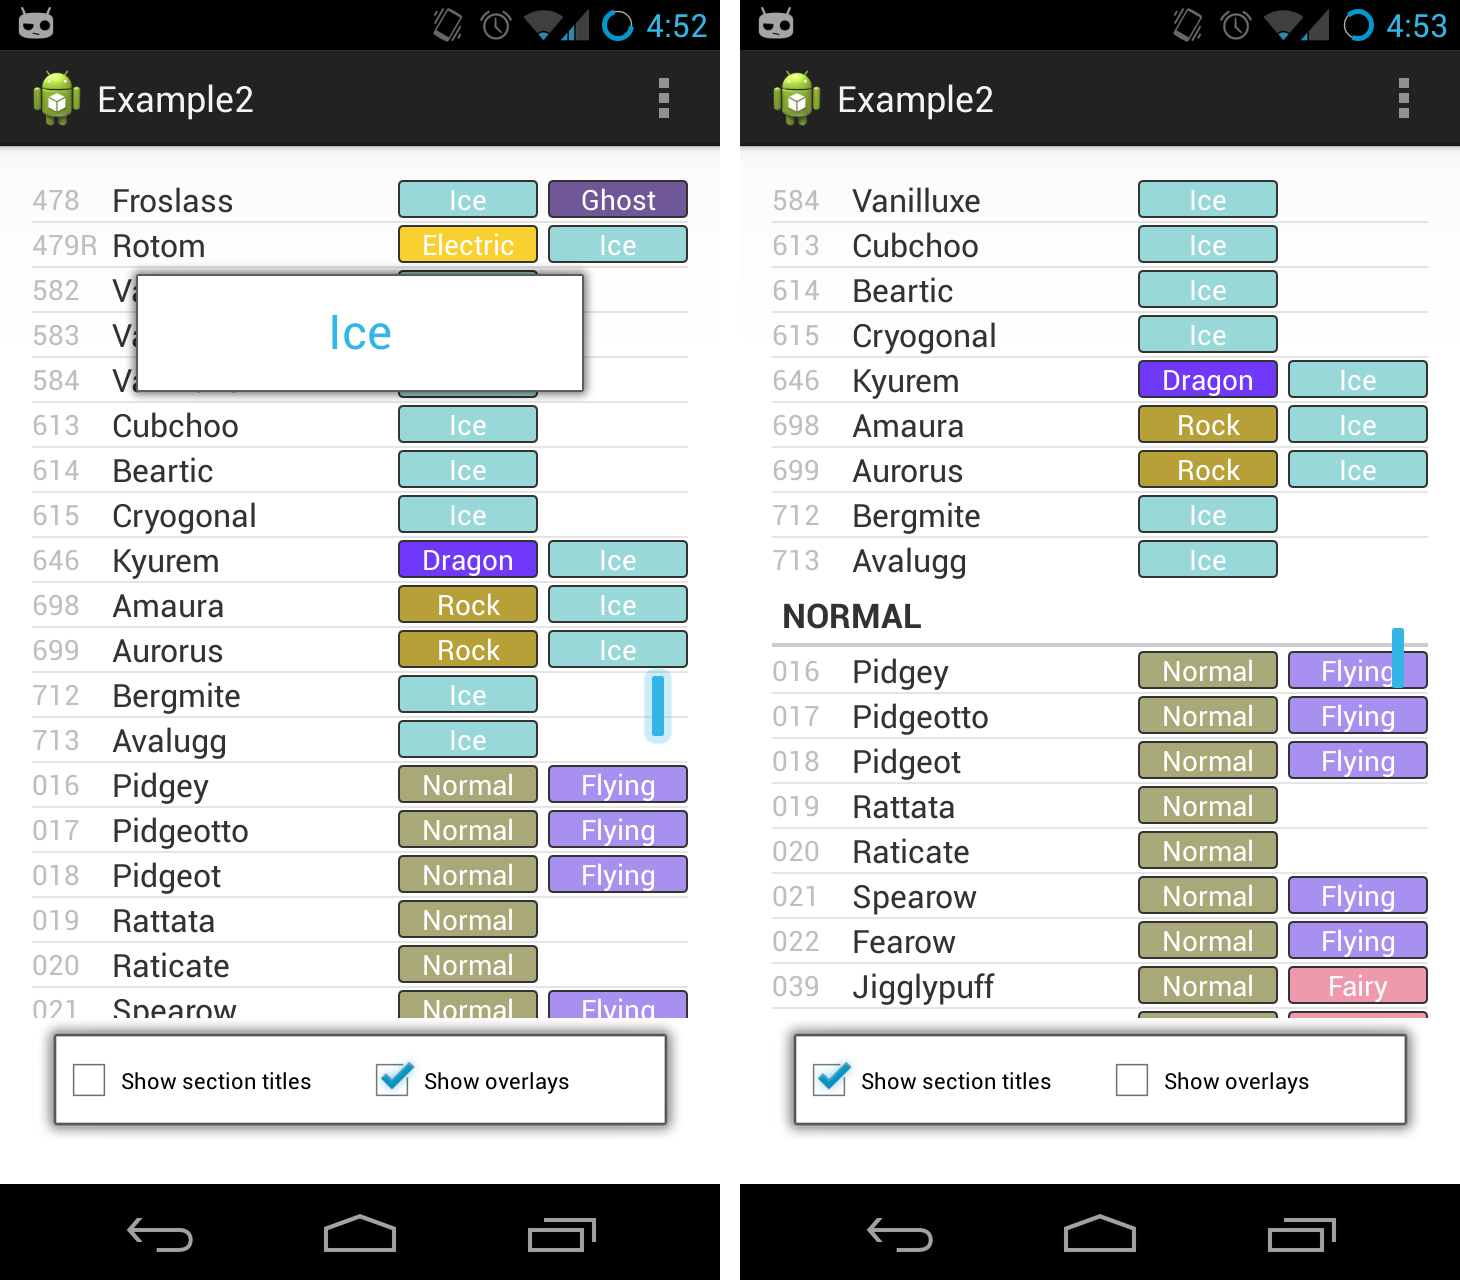
Now, let’s say we want to organize Pokémon by type. Each Pokémon has at least one elemental type (such as “fire” or “water”), but some have two. Ideally we would like to list Pokémon in multiple categories, so they could appear multiple times in the list.
To do so, we will define a MultipleSectionizer instead of a regular Sectionizer:
  private void sortByType() {
    adapter.setMultipleSectionizer(
        new MultipleSectionizer<PocketMonster>() {

      @Override
      public Collection<? extends CharSequence> toSections(
          PocketMonster monster) {
        String type1 = monster.getType1();
        String type2 = monster.getType2();

        if (!TextUtils.isEmpty(type2)) { // two types
          return Arrays.asList(type1, type2);
        } else { // one type
          return Collections.singleton(type1);
        }
      }
    });
    adapter.setKeySorting(Sorting.Natural);
    adapter.setValueSorting(Sorting.InputOrder);
    scrollView.setOverlaySizeScheme(OverlaySizeScheme.Normal);

    // refresh the adapter and scroll view
    adapter.notifyDataSetChanged();
    scrollView.refresh();
  }
Notice that the key sorting has again changed, this time to Sorting.Natural, which simply sorts alphabetically. Value sorting has changed to Sorting.InputOrder, because we’ve decided to sort Pokémon by their national IDs.
This works as expected:

Notice that Charizard appears in both in the “Fire” and “Flying” sections, since he has two types.
This example app also shows how you can disable the section titles or section overlays, just in case you don’t like them. These values can also be set during the Builder chain, using hideSectionTitles() and hideSectionOverlays().
You can read the Java documentation for more information about customizing the SuperSaiyanScrollView and the SectionedListAdapter.
Summary
The SuperSaiyanScrollView is a cool new library, and you should be using it. File bugs on me ‘n’ stuff, if there are any missing features you’d like to have.


Posted by Dominik on December 17, 2013 at 6:47 AM
Hi,
very nice library.. does it also support GridView?
Posted by Nolan Lawson on December 17, 2013 at 5:40 PM
Not really. GridView doesn’t allow items to span multiple columns, so the section titles just show up in one column or the other, which is probably not what you want.
In your case, I would probably either use a ListView where each row holds 2+ items, or use a ListView where each item is its own GridView. Either of these would be compatible with the SuperSaiyanScrollView as-is.
Posted by rahulpawar31 on January 7, 2014 at 10:15 PM
Hi,
Great lib.
But is there any way to set visibility of scrollbar so that scrollbar will be always visible?
Posted by Nolan Lawson on January 7, 2014 at 10:48 PM
Gray scrollbars: yes. Just set scrollbars=false on the ListView. Fast scrollbars: no. However, I’d recommend against keeping the scrollbar omnipresent; it’s been a UI pattern since Froyo that the scrollbars disappear when you’re not scrolling.
Posted by Mundoff on March 20, 2014 at 5:44 PM
Hello, great project, would it be possible to have sticky headers? I mean like Contacts in Kit Kat: http://imgur.com/sQYKa8m also the right margin would be interesting.
Thank you very much.
Posted by Nolan Lawson on March 20, 2014 at 5:46 PM
Great idea, just log an issue on the Github page. Also some screenshots or a mockup would be helpful to know what you mean.
Posted by Mundoff on March 21, 2014 at 1:34 PM
Done: https://github.com/nolanlawson/SuperSaiyanScrollView/issues/4
Posted by Aniket Bhsoale on July 8, 2015 at 8:11 AM
How to apply OnitemClick listener for listview?
Scrollview holds onitemclick listener
Posted by Leandro on April 25, 2017 at 7:43 AM
Hola, ya hace un tiempo que hiciste este articulo espero que me puedas responder la pregunta que te haré. Necesito importar el modulo este: https://github.com/nolanlawson/SuperSaiyanScrollView/, a mi proyecto android estudio, lo quiero hacer offline, es decir descargo el proyecto de GitHUB manual, y me da problemas al agregar el modulo al proyecto, ya descargue la sdk con la que esta hecho este modulo, pero el problema continua, mis clases no ven el modulo o sea cuando intento hacer instancias del mismo no lo encuentra nunca.
Posted by leandro on April 26, 2017 at 10:53 AM
Hello, since you did this article for a while, I hope you can answer the question that I will ask you. I need to import the module this: https://github.com/nolanlawson/SuperSaiyanScrollView/, to my android studio project, I want to do it offline, ie I download the GitHUB manual project, and it gives me problems when adding the module to the project, Already download the sdk with which this module is made, but the problem continues, my classes do not see the module or when I try to make instances of it never find it.